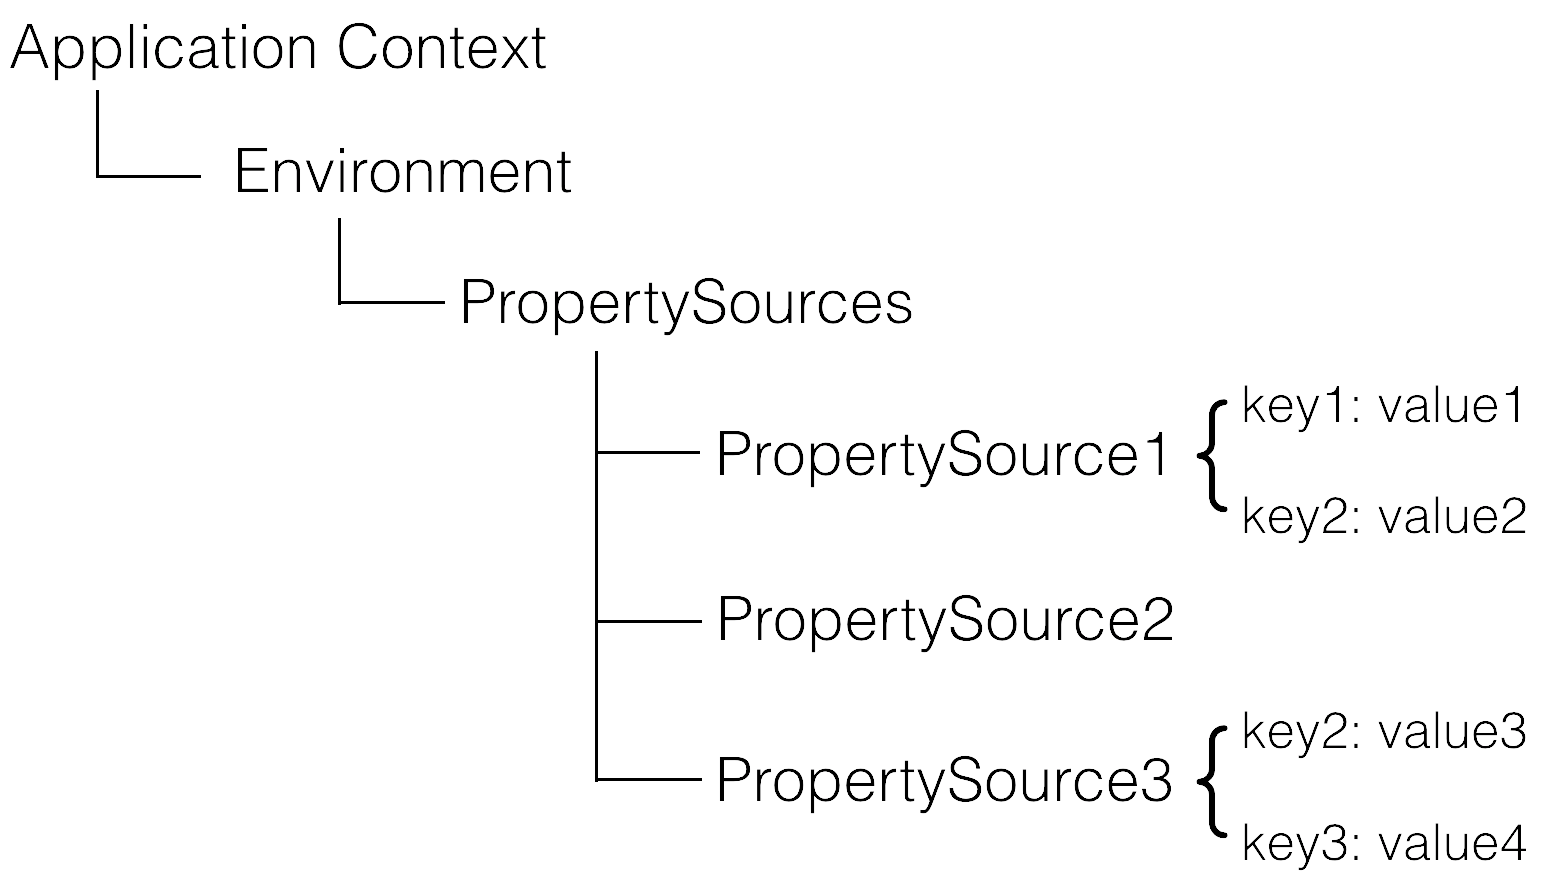
Spring从3.1版本开始增加了ConfigurableEnvironment和PropertySource:
- ConfigurableEnvironment
- Spring的ApplicationContext会包含一个Environment(实现ConfigurableEnvironment接口)
- ConfigurableEnvironment自身包含了很多个PropertySource
- PropertySource
- 属性源
- 可以理解为很多个Key - Value的属性配置
在运行时的结构形如:

需要注意的是,PropertySource之间是有优先级顺序的,如果有一个Key在多个property source中都存在,那么在前面的property source优先。
所以对上图的例子:
- env.getProperty(“key1”) -> value1
- env.getProperty(“key2”) -> value2
- env.getProperty(“key3”) -> value4
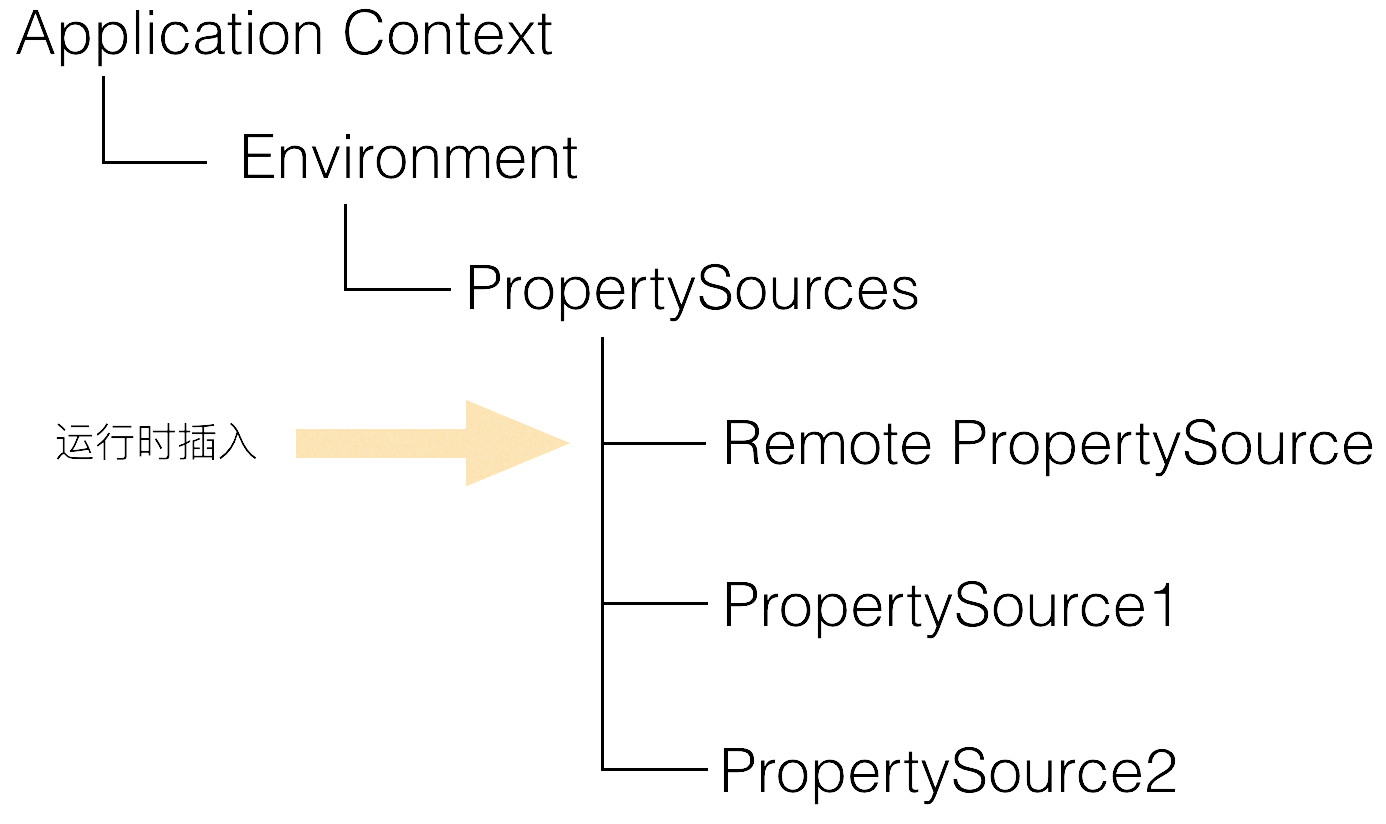
在理解了上述原理后,Apollo和Spring/Spring Boot集成的手段就呼之欲出了:在应用启动阶段,Apollo从远端获取配置,然后组装成PropertySource并插入到第一个即可,如下图所示:

https://github.com/ctripcorp/apollo/wiki/Apollo%E9%85%8D%E7%BD%AE%E4%B8%AD%E5%BF%83%E8%AE%BE%E8%AE%A1#133-meta-server 如果有多个文件时, classpath* 前缀再加上通配符,会搜到所有符合的文件;classpath前缀再加上通配符则可能会在找到一个符合的之后不再查找。所以使用classpath* 总是没错的。 参考资料:
标准JDK中使用 java.net.URL 来处理资源,但有很多不足,例如不能限定classpath,不能限定 ServletContext 路径。
所以,Spring提供了 Resource 接口。
注意,Spring提供的Resource抽象不是要取代(replace)标准JDK中的功能,而是尽可能的封装(wrap)它。
例如,UrlResource 就封装了一个URL。
介绍
Spring内置了很多Resource实现,以用于不同情况。如下:
UrlResource ,ClassPathResource ,FileSystemResource ,ServletContextResource ,InputStreamResource ,ByteArrayResource ;
基本上可以根据名字判断出各自的适用环境。
使用
ResourceLoader,这个接口只有一个方法,用于返回Resource实例。
ApplicationContext接口继承了该接口,就是说,所有的ApplicationContext实现都实现了其方法,能够返回一个Resource实例。
默认情况下,根据不同的ApplicationContext实现,会返回不同的Resource类型,例如:
Resource template = ctx.getResource("some/resource/path/myTemplate.txt"); 1 如果ctx是一个ClassPathXmlApplicationContext,那会返回一个ClassPathResource。2 如果ctx是一个FileSystemXmlApplicationContext ,那会返回一个FileSystemResource。3 如果ctx是一个WebApplicationContext,那会返回一个ServletContextResource。
但是,可以通过前缀来指定返回的Resource 实例类型:
Resource template = ctx.getResource("classpath:some/resource/path/myTemplate.txt");Resource template = ctx.getResource("file:///some/resource/path/myTemplate.txt");Resource template = ctx.getResource("http://myhost.com/resource/path/myTemplate.txt"); 前缀列表:
| Prefix | Example | Explanation |
| classpath: | classpath:config/app.xml | 从classpath中加载。 |
| file: | file:///data/app.xml | FileSystem的URL。 |
| http: | URL。 | |
| (none) | /data/app.xml | 依赖具体的ApplicationContext实现。 |
另外,ClassPathXmlApplicationContext 可以根据 Class的路径 推断出资源路径。需要在同一个包下。
new ClassPathXmlApplicationContext(new String[]{"a.xml","b.xml"}, Config.class); 上面这个例子,要求a.xml、b.xml、Config.class在同一个包下。
ApplicationContext ctx = new FileSystemXmlApplicationContext("conf/context.xml"); ApplicationContext ctx = new FileSystemXmlApplicationContext("/conf/context.xml"); 另外,上面这两个又分别等效于下面这两个:
FileSystemXmlApplicationContext ctx = ...;ctx.getResource("some/resource/path/myTemplate.txt"); FileSystemXmlApplicationContext ctx = ...;ctx.getResource("/some/resource/path/myTemplate.txt");
2、由其他ApplicationContext实例返回。这种情况下,FileSystemResource会按我们预期的来处理相对路径和绝对路径:相对路径是相对于当前工作路径;绝对路径是FileSystem的根路径。
FileSystemResource /FileSystemXmlApplicationContext,使用URL前缀 file:来返回UrlResource即可。如下: // actual context type doesn't matter, the Resource will always be UrlResourcectx.getResource("file:///some/resource/path/myTemplate.txt"); // force this FileSystemXmlApplicationContext to load its definition via a UrlResourceApplicationContext ctx = new FileSystemXmlApplicationContext("file:///conf/context.xml"); http://www.cnblogs.com/larryzeal/p/5915693.html
@Value的值有两类:
① ${ property : default_value }② #{ obj.property? : default_value }就是说,第一个注入的是外部参数对应的property,第二个则是SpEL表达式对应的内容。那个 default_value,就是前面的值为空时的默认值。注意二者的不同。import org.springframework.beans.factory.annotation.Value;import org.springframework.stereotype.Component;@Componentpublic class AnotherObj { @Value("${jdbc.user}") private String name; @Value("${jdbc.pwd}") private String pwd; public String getName() { return name; } public void setName(String name) { this.name = name; } public String getPwd() { return pwd; } public void setPwd(String pwd) { this.pwd = pwd; }}
import javax.annotation.PostConstruct;import org.springframework.beans.factory.annotation.Value;import org.springframework.stereotype.Component;@Componentpublic class ValueDemo { @Value("${jdbc.driverClass}") private String driver; @Value("#{ anotherObj.name}") private String name; @PostConstruct public void run(){ System.out.println(driver); System.out.println(name); } }
Spring MVC 提供了一种机制,可以构造和编码URI -- 使用UriComponentsBuilder和UriComponents。
例:UriComponents uriComponents = UriComponentsBuilder.fromUriString( "http://example.com/hotels/{hotel}/bookings/{booking}").build();URI uri = uriComponents.expand("42", "21").encode().toUri(); 嗯,expand()是用于替换所有的模板变量,encode默认使用UTF8编码。
注意,UriComponents是不可变的,expand()和encode()都是返回新的实例。你还可以这样做:
UriComponents uriComponents = UriComponentsBuilder.newInstance().scheme("http").host("example.com").path("/hotels/{hotel}/bookings/{booking}").build().expand("42", "21").encode(); 1、构造连接到controllers和methods的URIs
@Controller@RequestMapping("/hotels/{hotel}")public class BookingController { @GetMapping("/bookings/{booking}") public String getBooking(@PathVariable Long booking) { // ... }} 你可以通过名字引用该方法,来准备一个连接:
UriComponents uriComponents = MvcUriComponentsBuilder .fromMethodName(BookingController.class, "getBooking", 21).buildAndExpand(42);URI uri = uriComponents.encode().toUri();
中上面的例子中,我们提供了实际的方法参数值,21。更进一步,我们还提供了42以填补剩余的URI变量,例如”hotel”。如果该方法拥有更多参数,你可以为那些不需要出现在URI中的参数提供null。
一般来说,只有@PathVariable和@RequestParam参数与构建URL相关。还有其他方式来使用MvcUriComponentsBuilder。例如,你可以使用一种技术族来模拟测试 -- 通过代理以避免通过名字引用controller name (下例假定已静态导入了MvcUriComponentsBuilder.on):
UriComponents uriComponents = MvcUriComponentsBuilder .fromMethodCall(on(BookingController.class).getBooking(21)).buildAndExpand(42);URI uri = uriComponents.encode().toUri();
上例中,使用了MvcUriComponentsBuilder中的静态方法。在内部,他们依赖于ServletUriComponentsBuilder 来准备一个base URL -- 基于当前request的scheme、host、port、context path以及 servlet path。大多数时候这样很有效,然而,有时候也是不够的。例如,你可能在request的context之外(例如,准备links的批处理),或者你需要插入一个path前缀 (例如,locale前缀 -- 从request path中被移除过的,且需要被重新插入连接)。
这些情况下,你可以使用静态的”fromXxx”方法的重载 -- 那些接收一个UriComponentsBuilder的方法,来使用base URL。或者,你可以使用一个base URL来创建MvcUriComponentsBuilder的实例,然后使用该实例的”withXxx”方法。 例如:UriComponentsBuilder base = ServletUriComponentsBuilder.fromCurrentContextPath().path("/en");MvcUriComponentsBuilder builder = MvcUriComponentsBuilder.relativeTo(base);builder.withMethodCall(on(BookingController.class).getBooking(21)).buildAndExpand(42);URI uri = uriComponents.encode().toUri(); 2、从views构建连接到controllers和methods的URIs
你还可以从views(如JSP、Thymeleaf、FreeMarker)构建到注解controllers的连接。使用MvcUriComponentsBuilder的fromMappingName(..)方法即可。
每个@RequestMapping都被给定了一个默认的名字 -- 基于class的大写字母和全方法名。例如,FooController中的getFoo方法,被赋予了名字”FC#getFoo”。这种策略可以被替换或定制--通过创建一个HandlerMethodMappingNamingStrategy实例,再将其插入你的RequestMappingHandlerMapping即可。默认的策略实现还要看一下@RequestMapping的name attribute,如果有则使用。这意味着,如果默认被赋予的映射名字与其他的发生了冲突(例如,重载的方法),你可以给该@RequestMapping显式的赋予一个name。
被赋予的请求映射名字,在启动时会被以TRACE级别记录。
Spring JSP tag库 提供了一个功能,叫做mvcUrl,可被用于基于该机制准备到controller methods的连接。
例如,当给定以下controller时:
@RequestMapping("/people/{id}/addresses")public class PersonAddressController { @RequestMapping("/{country}") public HttpEntity getAddress(@PathVariable String country) { ... }} 你可以准备一个连接--从JSP中,如下:
<%@ taglib uri="http://www.springframework.org/tags" prefix="s" %>...Get Address
上面的例子依赖于Spring 标签库(如 META-INF/spring.tld)中声明的mvcUrl JSP功能。
https://www.cnblogs.com/larryzeal/p/6131664.html
本篇文章是由朋友的一篇博客引出的,博客原文地址:
他这篇博客比较细的讲解了classpath与classpath*,以及通配符的使用,那些配置能成功加载到资源,那些配置加载不了资源。但是我相信仍然有很多同学不明白,为什么是这样的,知其然,不知其所以然,那么本篇文章将慢慢为你揭开神秘的面纱,让你知其然,更知其所以然。
关于Spring Resource的资源类型以及继承体系我们已经在上一篇文件粗略的说了一下。Spring加载Resource文件是通过ResourceLoader来进行的,那么我们就先来看看ResourceLoader的继承体系,让我们对这个模块有一个比较系统的认知。
上图仅右边的继承体系,仅画至AbstractApplicationContext,由于ApplicationContext的继承体系,我们已经在前面章节给出,所以为了避免不必要的复杂性,本章继承体系就不引入ApplicationContext。
我们还是来关注本章的重点————classpath 与 classpath*以及通配符是怎么处理的
首先,我们来看下ResourceLoader的源码
- public interface ResourceLoader {
- /** Pseudo URL prefix for loading from the class path: "classpath:" */
- String CLASSPATH_URL_PREFIX = ResourceUtils.CLASSPATH_URL_PREFIX;
- Resource getResource(String location);
- ClassLoader getClassLoader();
- }
- public interface ResourcePatternResolver extends ResourceLoader {
- /**
- * Pseudo URL prefix for all matching resources from the class path: "classpath*:"
- * This differs from ResourceLoader's classpath URL prefix in that it
- * retrieves all matching resources for a given name (e.g. "/beans.xml"),
- * for example in the root of all deployed JAR files.
- * @see org.springframework.core.io.ResourceLoader#CLASSPATH_URL_PREFIX
- */
- String CLASSPATH_ALL_URL_PREFIX = "classpath*:";
- Resource[] getResources(String locationPattern) throws IOException;
- }
通过2个接口的源码对比,我们发现ResourceLoader提供 classpath下单资源文件的载入,而ResourcePatternResolver提供了多资源文件的载入。
ResourcePatternResolver有一个实现类:PathMatchingResourcePatternResolver,那我们直奔主题,查看PathMatchingResourcePatternResolver的getResources()
- public Resource[] getResources(String locationPattern) throws IOException {
- Assert.notNull(locationPattern, "Location pattern must not be null");
- //是否以classpath*开头
- if (locationPattern.startsWith(CLASSPATH_ALL_URL_PREFIX)) {
- //是否包含?或者*
- if (getPathMatcher().isPattern(locationPattern.substring(CLASSPATH_ALL_URL_PREFIX.length()))) {
- // a class path resource pattern
- return findPathMatchingResources(locationPattern);
- }
- else {
- // all class path resources with the given name
- return findAllClassPathResources(locationPattern.substring(CLASSPATH_ALL_URL_PREFIX.length()));
- }
- }
- else {
- // Only look for a pattern after a prefix here
- // (to not get fooled by a pattern symbol in a strange prefix).
- int prefixEnd = locationPattern.indexOf(":") + 1;
- //是否包含?或者*
- if (getPathMatcher().isPattern(locationPattern.substring(prefixEnd))) {
- // a file pattern
- return findPathMatchingResources(locationPattern);
- }
- else {
- // a single resource with the given name
- return new Resource[] {getResourceLoader().getResource(locationPattern)};
- }
- }
- }
由此我们可以看出在加载配置文件时,以是否是以classpath*开头分为2大类处理场景,每大类在又根据路径中是否包括通配符分为2小类进行处理,
处理的流程图如下:
从上图看,整个加载资源的场景有三条处理流程
- 以classpath*开头,但路径不包含通配符的
- protected Resource[] findAllClassPathResources(String location) throws IOException {
- String path = location;
- if (path.startsWith("/")) {
- path = path.substring(1);
- }
- Enumeration<URL> resourceUrls = getClassLoader().getResources(path);
- Set<Resource> result = new LinkedHashSet<Resource>(16);
- while (resourceUrls.hasMoreElements()) {
- URL url = resourceUrls.nextElement();
- result.add(convertClassLoaderURL(url));
- }
- return result.toArray(new Resource[result.size()]);
- }
- public ClassLoader getClassLoader() {
- return getResourceLoader().getClassLoader();
- }
- public ResourceLoader getResourceLoader() {
- return this.resourceLoader;
- }
- //默认情况下
- public PathMatchingResourcePatternResolver() {
- this.resourceLoader = new DefaultResourceLoader();
- }
- public Enumeration<URL> getResources(String name) throws IOException {
- Enumeration[] tmp = new Enumeration[2];
- if (parent != null) {
- tmp[0] = parent.getResources(name);
- } else {
- tmp[0] = getBootstrapResources(name);
- }
- tmp[1] = findResources(name);
- return new CompoundEnumeration(tmp);
- }
- 不以classpath*开头,且路径不包含通配符的
- return new Resource[] {getResourceLoader().getResource(locationPattern)};
- public Resource getResource(String location) {
- Assert.notNull(location, "Location must not be null");
- if (location.startsWith(CLASSPATH_URL_PREFIX)) {
- return new ClassPathResource(location.substring(CLASSPATH_URL_PREFIX.length()), getClassLoader());
- }
- else {
- try {
- // Try to parse the location as a URL...
- URL url = new URL(location);
- return new UrlResource(url);
- }
- catch (MalformedURLException ex) {
- // No URL -> resolve as resource path.
- return getResourceByPath(location);
- }
- }
- }
- 路径包含通配符的
- protected Resource[] findPathMatchingResources(String locationPattern) throws IOException {
- //拿到能确定的目录,即拿到不包括通配符的能确定的路径 比如classpath*:/aaa/bbb/spring-*.xml 则返回classpath*:/aaa/bbb/ //如果是classpath*:/aaa/*/spring-*.xml,则返回 classpath*:/aaa/
- String rootDirPath = determineRootDir(locationPattern);
- //得到spring-*.xml
- String subPattern = locationPattern.substring(rootDirPath.length());
- //递归加载所有的根目录资源,要注意的是递归的时候又得考虑classpath,与classpath*的情况,而且还得考虑根路径中是否又包含通配符,参考上面那张流程图
- Resource[] rootDirResources = getResources(rootDirPath);
- Set<Resource> result = new LinkedHashSet<Resource>(16);
- //将根目录所有资源中所有匹配我们需要的资源(如spring-*)加载result中
- for (Resource rootDirResource : rootDirResources) {
- rootDirResource = resolveRootDirResource(rootDirResource);
- if (isJarResource(rootDirResource)) {
- result.addAll(doFindPathMatchingJarResources(rootDirResource, subPattern));
- }
- else if (rootDirResource.getURL().getProtocol().startsWith(ResourceUtils.URL_PROTOCOL_VFS)) {
- result.addAll(VfsResourceMatchingDelegate.findMatchingResources(rootDirResource, subPattern, getPathMatcher()));
- }
- else {
- result.addAll(doFindPathMatchingFileResources(rootDirResource, subPattern));
- }
- }
- if (logger.isDebugEnabled()) {
- logger.debug("Resolved location pattern [" + locationPattern + "] to resources " + result);
- }
- return result.toArray(new Resource[result.size()]);
- }
- protected String determineRootDir(String location) {
- int prefixEnd = location.indexOf(":") + 1;
- int rootDirEnd = location.length();
- while (rootDirEnd > prefixEnd && getPathMatcher().isPattern(location.substring(prefixEnd, rootDirEnd))) {
- rootDirEnd = location.lastIndexOf('/', rootDirEnd - 2) + 1;
- }
- if (rootDirEnd == 0) {
- rootDirEnd = prefixEnd;
- }
- return location.substring(0, rootDirEnd);
- }


